Fun with TomatoUSB and OpenBSD
With family visiting and a steady stream of folks around the house needing Wifi access, I decided it was about time to finally set up a properly segregated guest SSID to both rate limit and protect my internal hosts from potentially insecure guest devices. As usually happens to me with such projects, I went a bit overboard and ended up with something much more complex but way more fun to manage.
TomatoUSB already has support for multiple SSID configurations, tho it’s considered experimental and doesn’t have full gui support. You’ll also need to either build yourself or use a community build to get the full goodness. I chose Toastman’s builds since it also includes full VLAN support and he’s very active in the community. Installing the latest on my RT-N16 was easy enough and a quick ‘nvram wipe’ gave me a nice clean base to work with. Getting the extra SSID was pretty painless, added the extra vlan and bridge then ssh’d into the router, ran the relevant nvram commands and voila! This is prolly where I should have left it, but in doing my digging I came across this post which details using OpenWRT to create a trunk port carrying all vlans to the OpenBSD router.
Why trunk you may ask? Short answer - because it’s fun. Long answer - single
connection required to carry all routable traffic to my OpenBSD box where I can
restrict, rate shape, etc. to my heart’s content. Setup here was dead easy, the
NIC I was using for my internal network supports 802.1Q so all I had to do was
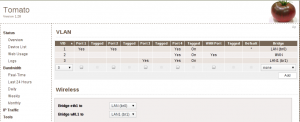
some point and click goodness to tag all three vlans (internal, WAN, wireless
guest) into port four on the RT-16N:

I also set the WAN port type to ‘Disabled’ in the basic network config page so the RT-16N wouldn’t try and get an external IP.
Once all that was done, I removed all ip configuration from my internal nic on the router and created the various vlan interfaces:
ifconfig vlan3 create
ifconfig vlan3 vlan 3 vlandev xl0
ifconfig vlan3 xxx.xxx.xx.x netmask 255.255.255.0 up
A quick tcpdump showed the right kinds of packets flowing across the new vlan interface, so I created the others (vlan1, vlan2) and then updated the various hostname.* files to reflect the new configs.
hostname.xl0 (interface just needs to be enabled):
up
hostname.vlan1 (static ip):
inet xxx.xxx.xx.x 255.255.255.0 NONE vlan 1 vlandev xl0 description "Interface in trusted VLAN (1)"
inet6 alias xxxx:xxx:x:xxx::1 64
hostname.vlan2 (dynamic, used for ISP):
dhcp NONE vlan 2 vlandev xl0 description "Interface in external VLAN (2)"
hostname.vlan3 (static ip, wireless guest subnet):
inet xxx.xxx.xx.x 255.255.255.0 NONE vlan 3 vlandev xl0 description "Interface in wireless guest VLAN (3)"
Yea, this is prolly way more complex than it should be for a home network, but the ability to do proper segregation of various traffic types is a big win in my opinion. The only downside I’ve encountered so far is with rate limiting as a whole. Since PF’s QOS is tied to individual interfaces, I can’t just pool all vlans together and have it shape that way. There’s prolly some way of doing it using static routes or even some virtual device, but I haven’t found it yet. For now I’m just aggressively limiting the bandwidth available to my guest network, but if anyone knows of a better way I’d be grateful for some pointers.
Leave a Comment